 In part 1 of this short series of blog entries on Salesforce’s Mutual Authentication feature, I explained how to enable, configure and test Mutual Authentication. In part 2, I documented the shortcomings of Salesforce’s Web Service Connector when trying to use Mutual Authentication, and showed how to work around them. This time, I’m going to show you how to use common Java HTTP Clients to call Salesforce APIs with Mutual Authentication. Recall from part 1 that enabling Mutual Authentiation on a Salesforce Profile means that users with that profile must call a separate API endpoint, connecting via TLS with a client key and certificate chain. A Java client application can load the client key and certificate as I explained in part 2:
// Make a KeyStore from the PKCS-12 file
KeyStore ks = KeyStore.getInstance("PKCS12");
try (FileInputStream fis = new FileInputStream(KEYSTORE_PATH)) {
  ks.load(fis, KEYSTORE_PASSWORD.toCharArray());
}

// Make a KeyManagerFactory from the KeyStore
KeyManagerFactory kmf = KeyManagerFactory.getInstance("SunX509");
kmf.init(ks, KEYSTORE_PASSWORD.toCharArray());

// Now make an SSL Context with our Key Manager and the default Trust Manager
SSLContext sslContext = SSLContext.getInstance("TLS");
sslContext.init(kmf.getKeyManagers(), null, null);
We’ll also need to obtain a session ID. I’ll just reuse the SOAP login code from last time, though you could also use any of the OAuth mechanisms.
// Login as normal to get instance URL and session token
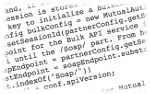
ConnectorConfig config = new ConnectorConfig();
config.setAuthEndpoint("https://login.salesforce.com/services/Soap/u/39.0");
config.setUsername(USERNAME);
config.setPassword(PASSWORD);
// Uncomment for more detail on what's going on!
//config.setTraceMessage(true);
// This will set the session info in config
Connector.newConnection(config);
// Display some current settings
System.out.println("Auth EndPoint: "+config.getAuthEndpoint());
System.out.println("Service EndPoint: "+config.getServiceEndpoint());
String sessionId = config.getSessionId();
String instance = new URL(config.getServiceEndpoint()).getHost();
Let’s look at how we proceed then, in a few common scenarios. All of the below code is available in this Github project.
Java’s HttpURLConnection
This is pretty much the most basic way of accessing an HTTP endpoint in Java. We create a URL object and get the HttpURLConnection as usual, then we can set the SSLSocketFactory on the connection:
// URL to get a list of REST services
// For example: https://na30.salesforce.com:8443/services/data/v41.0
URL url = new URL("https://" + instance + ":" + MUTUAL_AUTHENTICATION_PORT
    + "/services/data/v" + API_VERSION);

HttpURLConnection conn = (HttpURLConnection)url.openConnection();

// Check that we did get an HttpsURLConnection before casting to it
if (conn instanceof HttpsURLConnection) {
  ((HttpsURLConnection)conn).setSSLSocketFactory(sslContext.getSocketFactory());
}
Now we set the authorization header as we normally would. I’m also using the X-PrettyPrint header to make the REST API response a bit easier to read.
// Set the Authorization header
conn.setRequestProperty("Authorization", "OAuth "+sessionId);
// Make the response pretty
conn.setRequestProperty("X-PrettyPrint", "1");
Finally, we’ll pull the data from the HttpURLConnection’s OutputStream and dump it to System.out:
// Dump the response to System.out
try (BufferedReader br =
    new BufferedReader(
      new InputStreamReader(conn.getInputStream()))) {
  String input;

  while ((input = br.readLine()) != null){
    System.out.println(input);
  }
}
The result is the expected list of Salesforce REST services:
{
  "tooling" : "/services/data/v41.0/tooling",
  "metadata" : "/services/data/v41.0/metadata",
  ...lots more...
  "sobjects" : "/services/data/v41.0/sobjects",
  "actions" : "/services/data/v41.0/actions",
  "support" : "/services/data/v41.0/support"
}
Apache HttpClient
How does the same example look with Apache HttpClient? We just need to set the SSLContext in the Apache CloseableHttpClient:
// URL to get a list of REST services
String url = "https://" + instance + ":" + MUTUAL_AUTHENTICATION_PORT
    + "/services/data/v" + API_VERSION;

// Set the SSLContext in the HttpClient
try (CloseableHttpClient httpclient = HttpClients.custom()
    .setSSLContext(sslContext)
    .build()) {
  HttpGet httpGet = new HttpGet(url);
  // Set the Authorization header
  httpGet.addHeader("Authorization", "OAuth "+sessionId);
  // Make the response pretty
  httpGet.addHeader("X-PrettyPrint", "1");

  // Execute the request
  try (CloseableHttpResponse response = httpclient.execute(httpGet);
       BufferedReader br =
         new BufferedReader(
           new InputStreamReader(response.getEntity().getContent()))
  ){
    // Dump the response to System.out
    String input;
    while ((input = br.readLine()) != null){
      System.out.println(input);
    }
  }
}
The output is identical to the previous example.
Eclipse Jetty
Jetty is a little more complex. We need to create a Jetty SslContextFactory, rather than a standard Java KeyManagerFactory and SSLContext. Note that we need to set the KeyStore password in the SslContextFactory:
SslContextFactory sslContextFactory = new SslContextFactory();
sslContextFactory.setKeyStore(ks);
// Need to set password in the SSLContextFactory even though it's set in the KeyStore
sslContextFactory.setKeyStorePassword(KEYSTORE_PASSWORD);
Now we can create a Jetty HttpClient with the SslContextFactory, and start it:
HttpClient httpClient = new HttpClient(sslContextFactory);
httpClient.start();
Executing the request proceeds as usual, and results in identical output:
String response = httpClient.newRequest(url)
    .header("Authorization", "OAuth " + sessionId)
    .header("X-PrettyPrint", "1")
    .send()
    .getContentAsString();

System.out.println(response);
Don’t forget to stop the HttpClient when you’re done with it:
httpClient.stop();
Conclusion
Salesforce Mutual Authentication offers an additional layer of security over default server-authenticated TLS - clients must possess the key corresponding to a certificate configured in the Salesforce org. As I showed in part 1 of this series of blog entries, configuring Mutual Authentication in Salesforce is straightforward, as is testing the connection with curl, although the Salesforce documentation is not totally accurate. Salesforce’s Web Service Connector requires some modifications to make it compatible with Mutual Authentication, although, as I explained in part 2, it is possible to engineer around the issues. The popular Java HTTP clients all provide mechanisms for setting the client key and certificate, and using them to call the Salesforce REST APIs is straightforward. Source code showing how to use Mutual Authentication via all of the above mechanisms is available in my mutual-auth GitHub repo. I hope you’ve enjoyed this exploration of Mutual Authentication, and that you’ve saved yourself a bit of time by reading it!
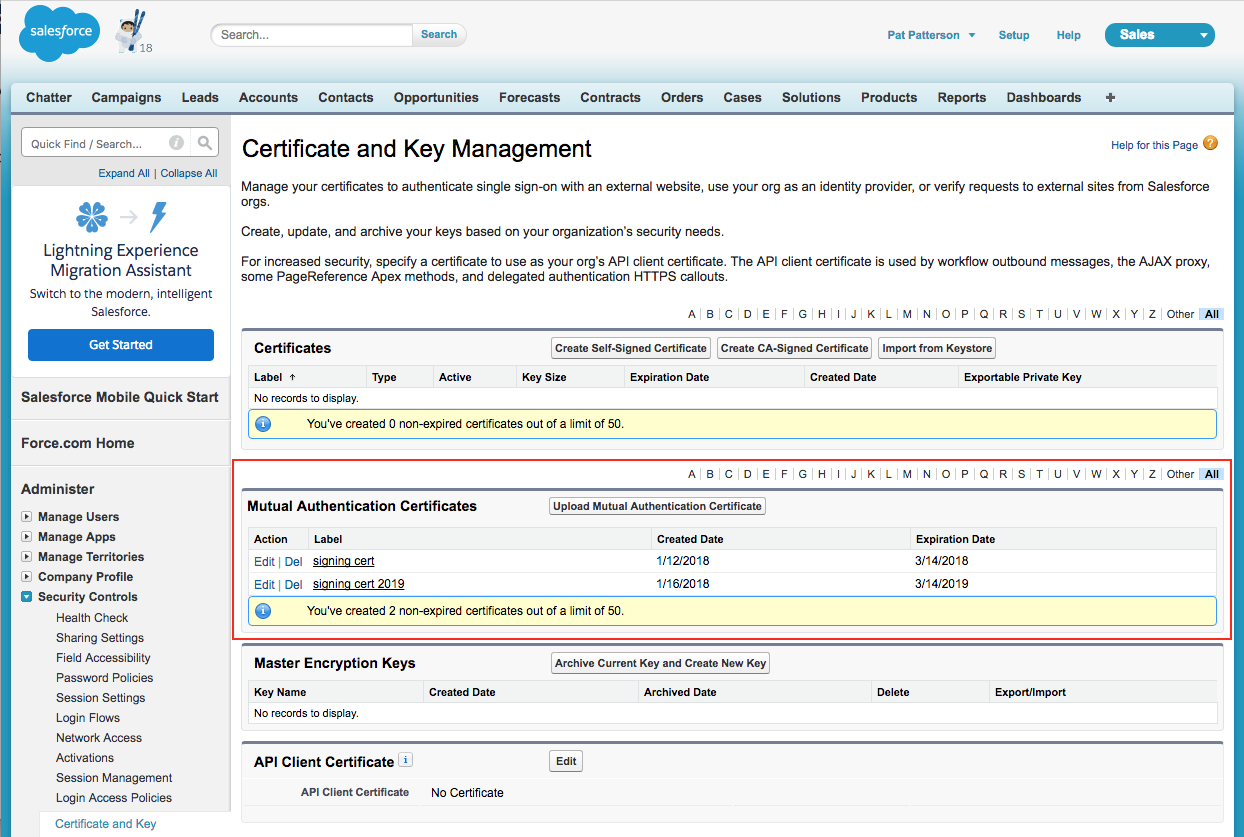
]]> In my last blog entry I explained how to enable, configure and test Salesforce’s Mutual Authentication feature. This time, I’ll share my experience getting Mutual Authentication working with the Java client SDK for Salesforce’s SOAP and Bulk APIs: Web Service Connector, aka WSC. StreamSets Data Collector’s Salesforce integration accesses the SOAP and Bulk APIs via WSC, so, when I was implementing Mutual Authentication in SDC, I examined WSC to see where I could configure the client key and certificate chain. Although there is no mention of
 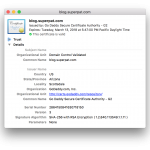 Mutual Authentication was introduced by Salesforce in the Winter ‘14 release. As the Salesforce Winter ‘14 release notes explain, mutually authenticated transport layer security (TLS) allows secure server-to-server connections initiated by a client using client certificate authentication, and means that both the client and the server authenticate and verify that they are who they say they are. In this blog post, I’ll show you how to enable Mutual Authentication and perform some basic tests using the curl command line tool. In a future blog post, I’ll show you how to implement Mutual Authentication in your Java apps. In the default case, without Mutual Authentication, when an API client connects to Salesforce via TLS, the client authenticates the server via its TLS certificate, but the TLS connection itself gives the server no information on the client’s identity. After the TLS session is established, the client sends a login request containing its credentials over the secure channel, the Salesforce login service responding with a session ID. The client then sends this session ID with each API request. Mutual Authentication provides an additional layer of security. Each time you connect to a Salesforce API, the server checks that the client’s certificate is valid for the client’s org, as well as checking the validity of the session ID. Note that Mutual Authentication is intended for API use and not for user interface (web browser) use. Before you can use Mutual Authentication, you need to obtain a client certificate. This certificate must be issued by a certificate authority with its root certificate in the Salesforce Outbound Messaging SSL CA Certificates list; Mutual Authentication will not work with a self-signed client certificate. More information is available in the Salesforce document, Set Up a Mutual Authentication Certificate. I bought an SSL certificate from GoDaddy - you can almost certainly find a cheaper alternative if you spend some time looking.
 As you might know from my last post, I moved from Salesforce to StreamSets a couple of weeks ago. It didn’t take long before I was signing up for a fresh Developer Edition org, though! I’m creating a StreamSets destination to allow me to write data to Wave Analytics datasets, and it’s fair to say that the documentation is… sparse. Working from the Wave Analytics External Data API Developer Guide and Wave Analytics External Data Format Reference (why are these separate docs???), and my understanding of how Salesforce works, I was able to put together a working sample Java app that creates a dataset from CSV data. Here’s the code - I explain a few idiosyncrasies below, and reveal the easiest way to get this working with Wave. [java] package wsc; import java.nio.charset.StandardCharsets; import java.util.Arrays; import java.util.List; import com.sforce.soap.partner.Connector; import com.sforce.soap.partner.Error; import com.sforce.soap.partner.PartnerConnection; import com.sforce.soap.partner.QueryResult; import com.sforce.soap.partner.SaveResult; import com.sforce.soap.partner.sobject.SObject; import com.sforce.ws.ConnectionException; import com.sforce.ws.ConnectorConfig; public class Main { // Describes the data we’ll be uploading static String metadataJson = “{\n” + “ "fileFormat": {\n” + “ "charsetName": "UTF-8",\n” + “ "fieldsDelimitedBy": ",",\n” + “ "fieldsEnclosedBy": "\"",\n” + “ "numberOfLinesToIgnore": 1\n” + “ },\n” + “ "objects": [\n” + “ {\n” + “ "connector": "AcmeCSVConnector",\n” + “ "description": "",\n” + “ "fields": [\n” + “ {\n” + “ "description": "",\n” + “ "fullyQualifiedName": "SalesData.Name",\n” + “ "isMultiValue": false,\n” + “ "isSystemField": false,\n” + “ "isUniqueId": false,\n” + “ "label": "Account Name",\n” + “ "name": "Name",\n” + “ "type": "Text"\n” + “ },\n” + “ {\n” + “ "defaultValue": "0",\n” + “ "description": "",\n” + “ "format": "$#,##0.00",\n” + “ "fullyQualifiedName": "SalesData.Amount",\n” + “ "isSystemField": false,\n” + “ "isUniqueId": false,\n” + “ "label": "Opportunity Amount",\n” + “ "name": "Amount",\n” + “ "precision": 10,\n” + “ "scale": 2,\n” + “ "type": "Numeric"\n” + “ },\n” + “ {\n” + “ "description": "",\n” + “ "fiscalMonthOffset": 0,\n” + “ "format": "MM/dd/yyyy",\n” + “ "fullyQualifiedName": "SalesData.CloseDate",\n” + “ "isSystemField": false,\n” + “ "isUniqueId": false,\n” + “ "label": "Opportunity Close Date",\n” + “ "name": "CloseDate",\n” + “ "type": "Date"\n” + “ }\n” + “ ],\n” + “ "fullyQualifiedName": "SalesData",\n” + “ "label": "Sales Data",\n” + “ "name": "SalesData"\n” + “ }\n” + “ ]\n” + “}”; // This is the data we’ll be uploading static String data = “Name,Amount,CloseDate\n” + “opportunityA,100.99,6/30/2014\n” + “opportunityB,99.01,1/31/2012\n”; // This will be the name of the data set in Wave // Must be unique across the organization static String datasetName = “tester”; // Change these as appropriate static final String USERNAME = “user@example.com”; static final String PASSWORD = “p455w0rd”; // Status values indicating that the job is done static final List<String> DONE = (List<String>)Arrays.asList( “Completed”, “CompletedWithWarnings”, “Failed”, “NotProcessed” ); public static void main(String[] args) { PartnerConnection connection; ConnectorConfig config = new ConnectorConfig(); config.setUsername(USERNAME); config.setPassword(PASSWORD); try { connection = Connector.newConnection(config); System.out.println(“Successfully authenticated as “+config.getUsername()); // Wave time! // First, we create an InsightsExternalData job SObject sobj = new SObject(); sobj.setType(“InsightsExternalData”); sobj.setField(“Format”,”Csv”); sobj.setField(“EdgemartAlias”, datasetName); sobj.setField(“MetadataJson”, metadataJson.getBytes(StandardCharsets.UTF_8)); sobj.setField(“Operation”,”Overwrite”); sobj.setField(“Action”,”None”); String parentID = null; SaveResult[] results = connection.create(new SObject[] { sobj }); for(SaveResult sv:results) { if(sv.isSuccess()) { parentID = sv.getId(); System.out.println(“Success creating InsightsExternalData: “+parentID); } else { for (Error e : sv.getErrors()) { System.out.println(“Error: “ + e.getMessage()); } System.exit(1); } } // Now upload some actual data. You can do this as many times as necessary, // subject to the Wave External Data API Limits sobj = new SObject(); sobj.setType(“InsightsExternalDataPart”); sobj.setField(“DataFile”, data.getBytes(StandardCharsets.UTF_8)); sobj.setField(“InsightsExternalDataId”, parentID); sobj.setField(“PartNumber”, 1); results = connection.create(new SObject[] { sobj }); for(SaveResult sv:results) { if(sv.isSuccess()) { String rowId = sv.getId(); System.out.println(“Success creating InsightsExternalDataPart: “+rowId); } else { for (Error e : sv.getErrors()) { System.out.println(“Error: “ + e.getMessage()); } System.exit(1); } } // Instruct Wave to start processing the data sobj = new SObject(); sobj.setType(“InsightsExternalData”); sobj.setField(“Action”,”Process”); sobj.setId(parentID); results = connection.update(new SObject[] { sobj }); for(SaveResult sv:results) { if(sv.isSuccess()) { String rowId = sv.getId(); System.out.println(“Success updating InsightsExternalData: “+rowId); } else { for (Error e : sv.getErrors()) { System.out.println(“Error: “ + e.getMessage()); } System.exit(1); } } // Periodically check whether the job is done boolean done = false; int sleepTime = 1000; while (!done) { try { Thread.sleep(sleepTime); sleepTime *= 2; } catch(InterruptedException ex) { Thread.currentThread().interrupt(); } QueryResult queryResults = connection.query( “SELECT Status FROM InsightsExternalData WHERE Id = ‘” + parentID + “’” ); if (queryResults.getSize() > 0) { for (SObject s: queryResults.getRecords()) { String status = (String)s.getField(“Status”); System.out.println(s.getField(“Status”)); if (DONE.contains(status)) { done = true; String statusMessage = (String)s.getField(“StatusMessage”); if (statusMessage != null) { System.out.println(statusMessage); } } } } else { System.out.println(“Can’t find InsightsExternalData with Id “ + parentID); } } } catch (ConnectionException e1) { e1.printStackTrace(); } } } [/java]
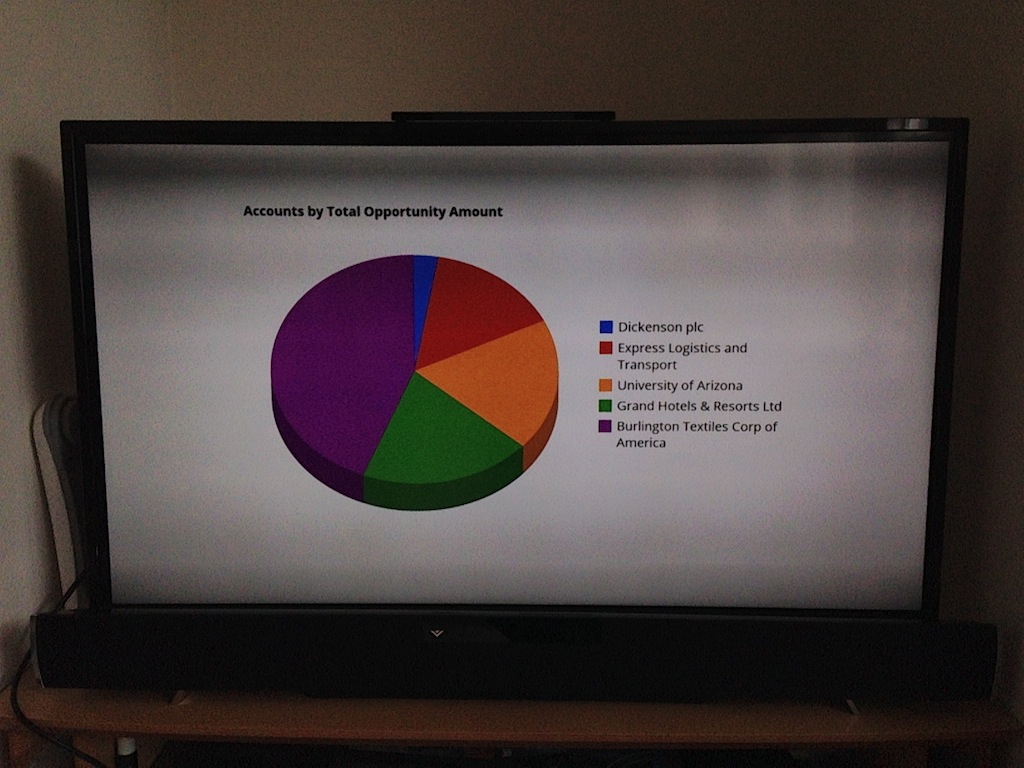
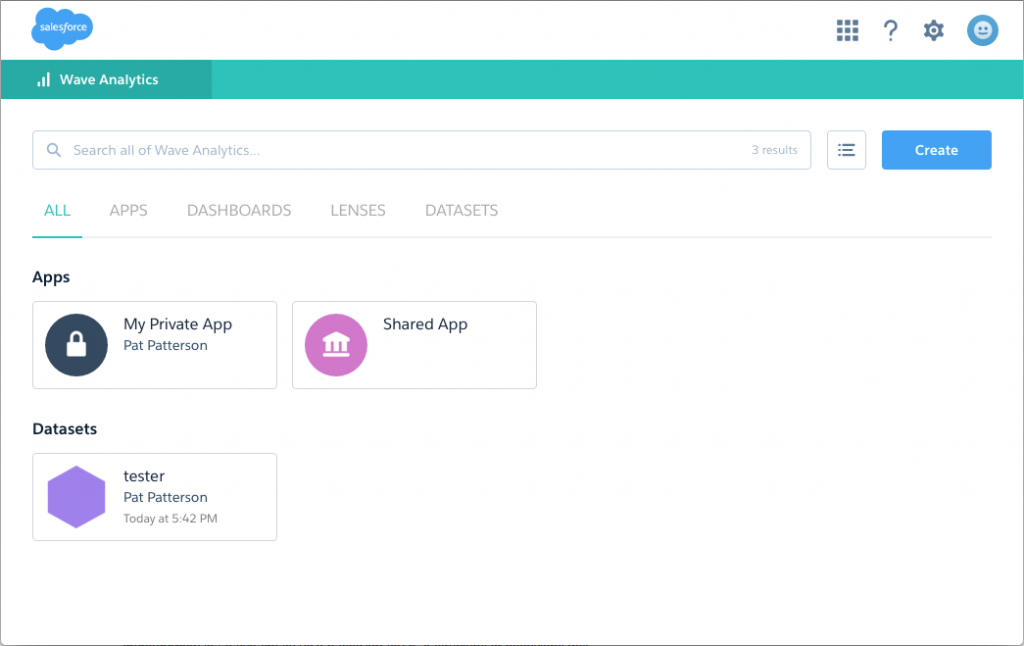 Click on ‘tester’ and you’ll see the ‘big blue line’:
 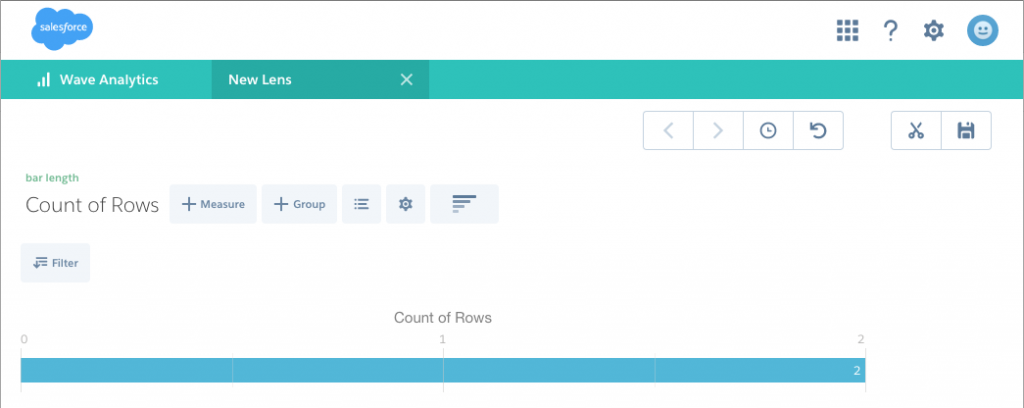 Now you can drill into the data (all 2 rows of it!) by account name, close date etc. You could, of course, extend the above code to accept a CSV filename and dataset name on the command line, and create all sorts of interesting extensions. Follow the
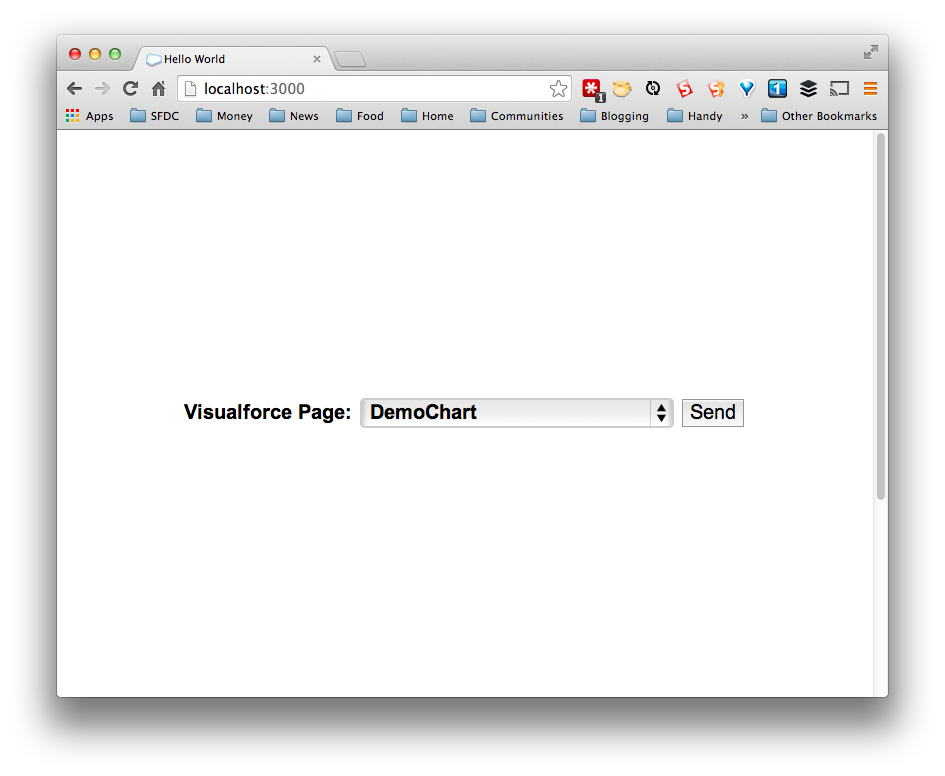
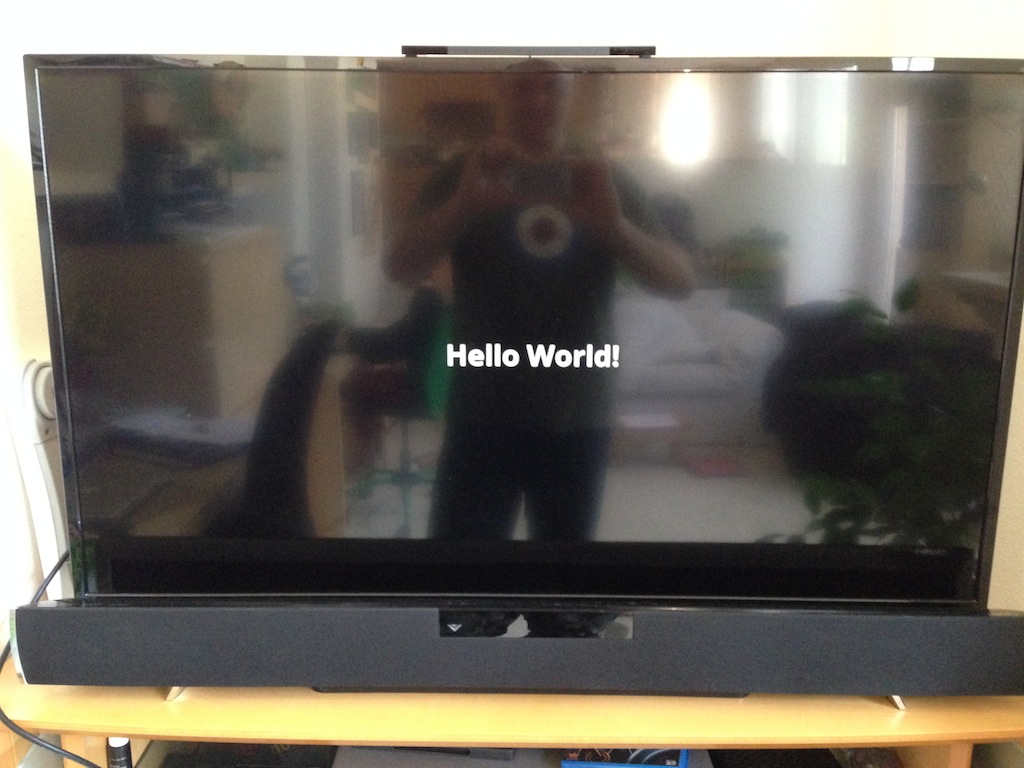
 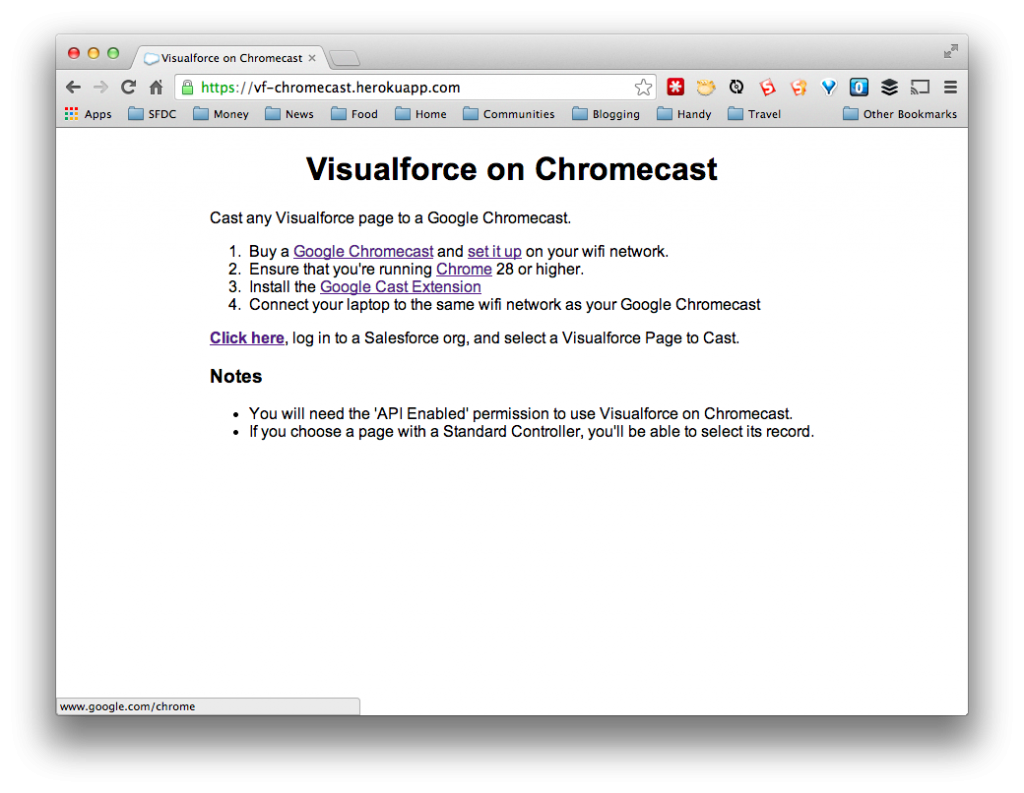 Follow the instructions, log in, authorize the app to access your data, and you’ll be able to select a Visualforce Page to ‘cast’ to your TV.
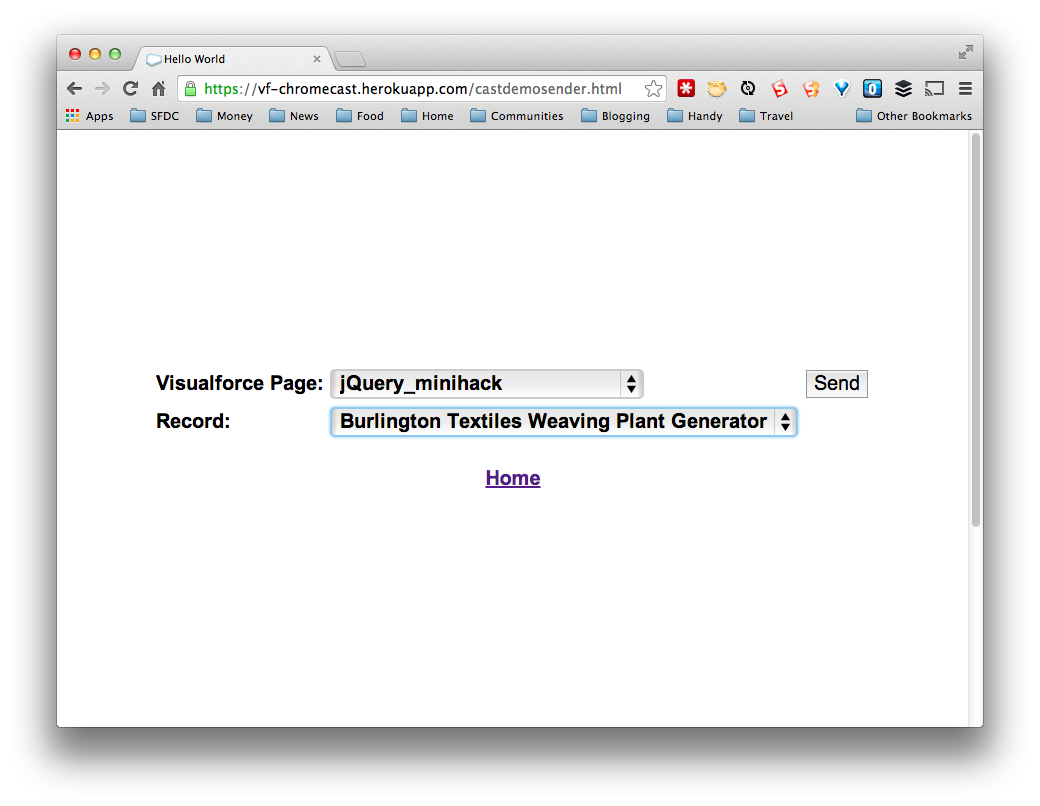
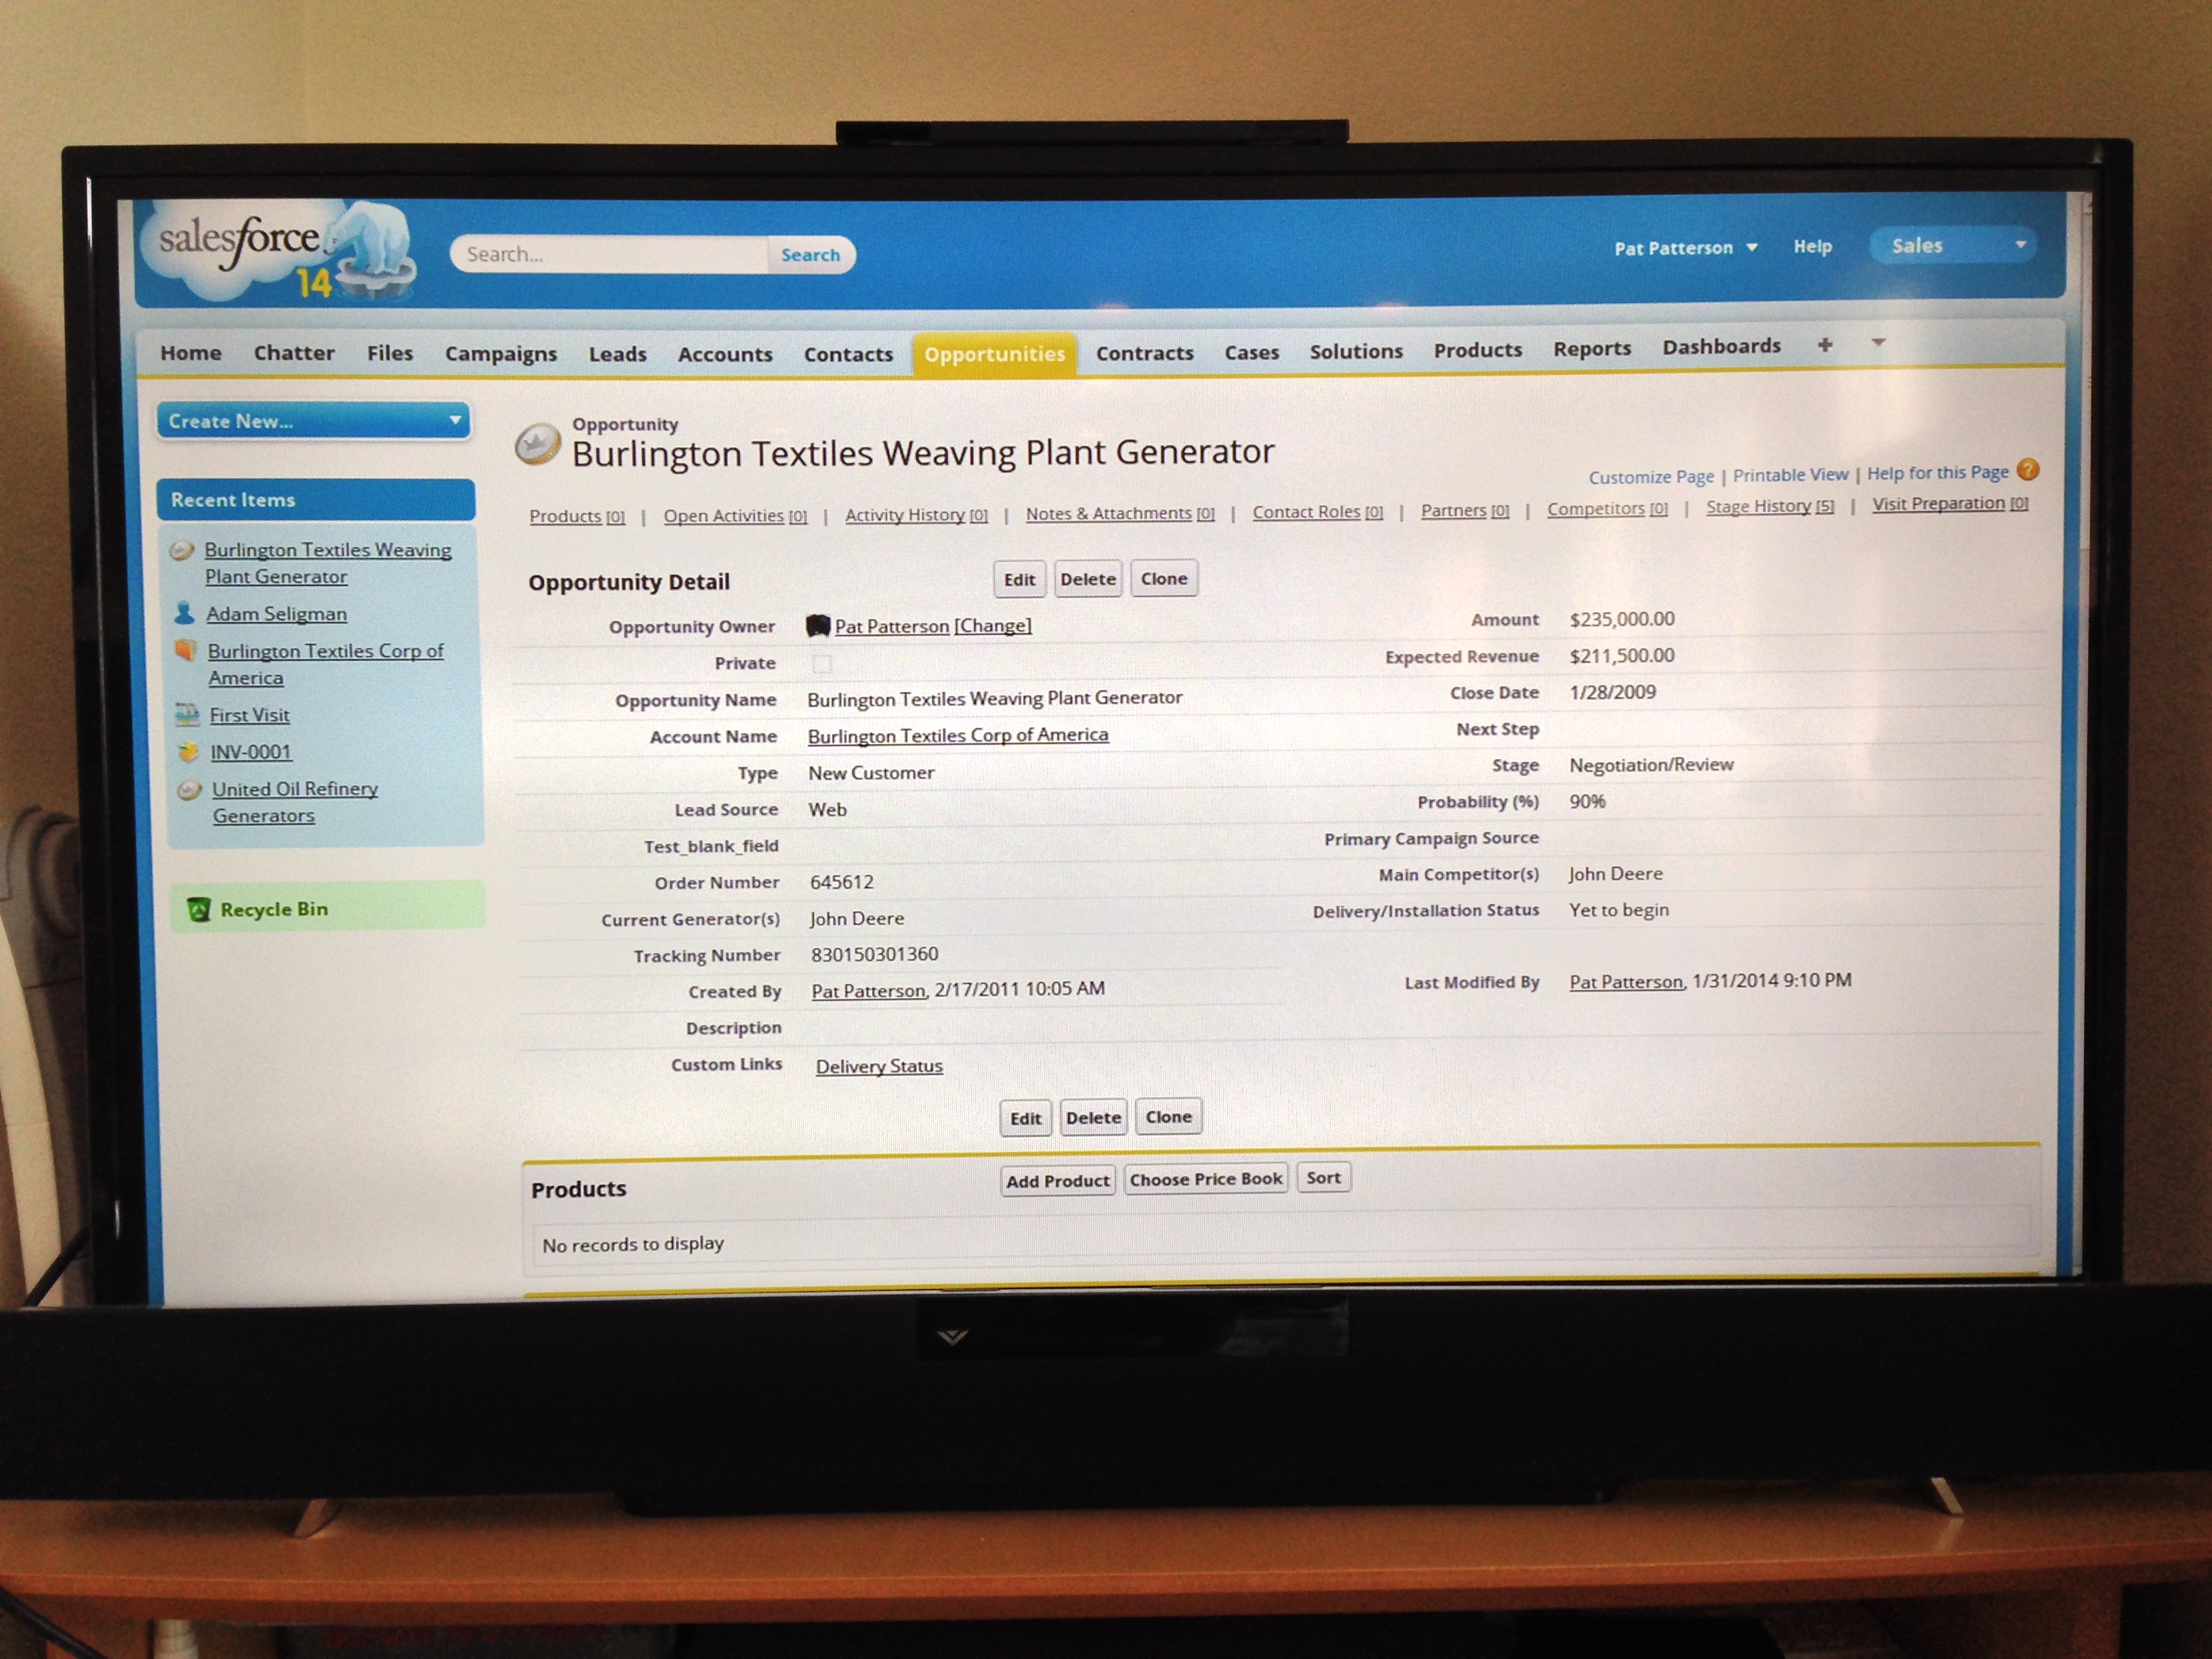


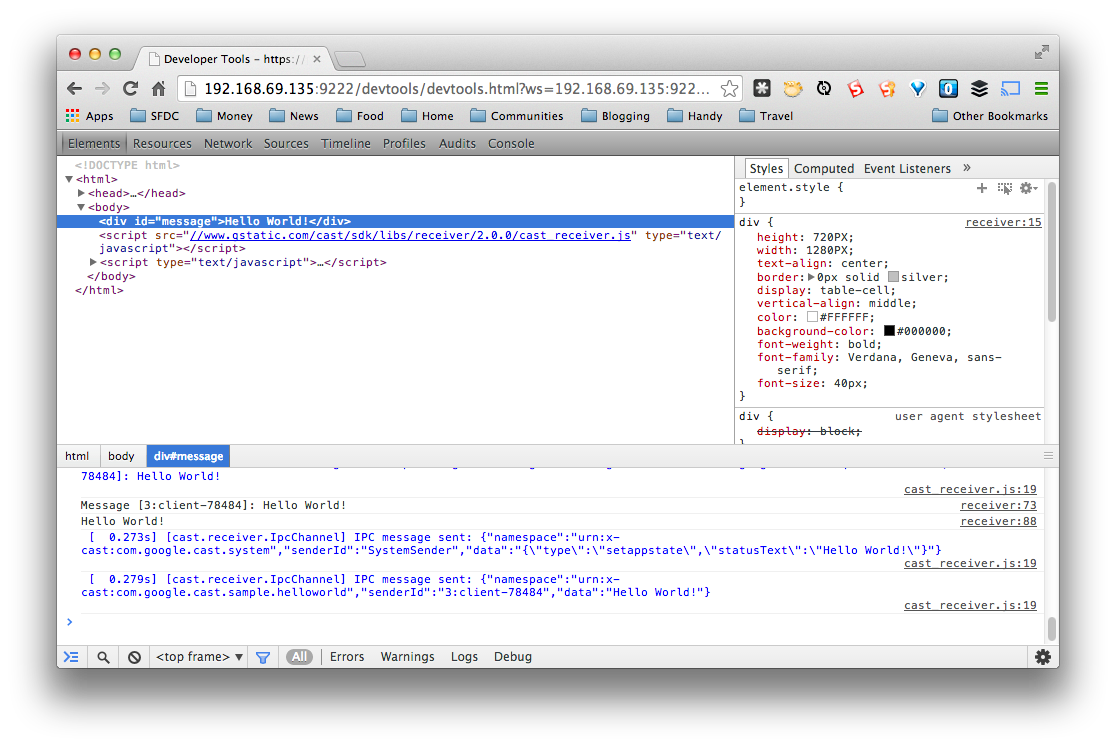
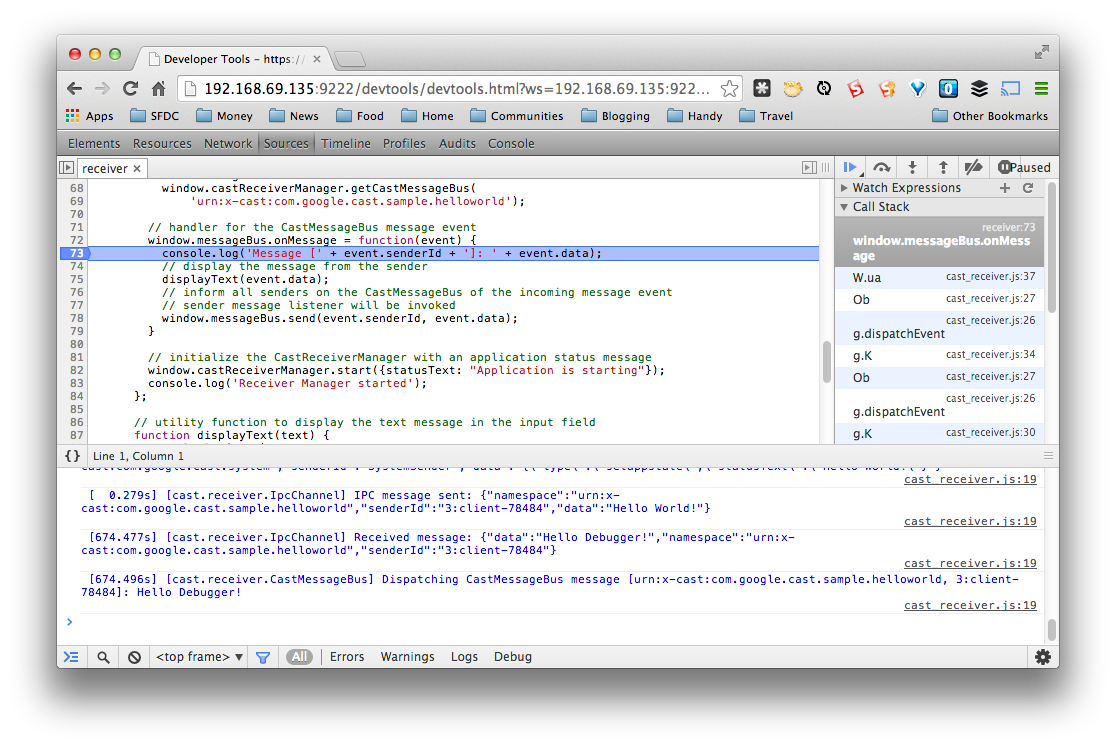


 . Connecting up to my monitor, I was disappointed to see no video signal whatsover - the monitor wasn’t seeing the Raspberry Pi at all. Googling around, I discovered that you can set various configuration options that are read before the Raspberry Pi even boots. With a little experimentation, I found that setting